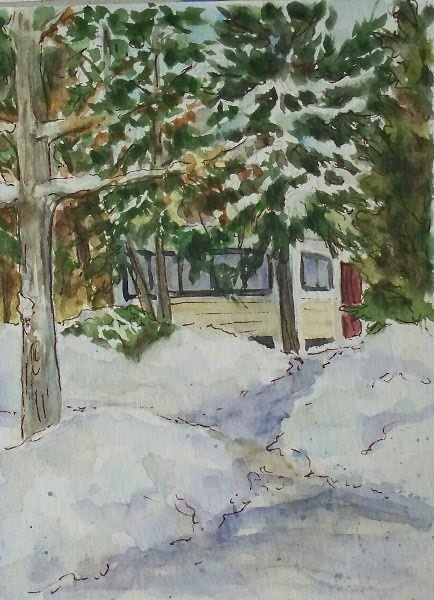
Snowy Cutchogue View - Demo
Several people have asked me to do a demo of my watercolor and ink work. Since I've been doing a lot of "plein air" painting from my car, I tried to take photos yesterday of what I was doing. This isn't one of my best paintings, but I thought it would give you an idea of what I do.
I parked my car and moved the driver's seat back as far as I could to give me room to paint on my lap. Usually I put some kind of journal between the seats so I can balance my fieldkit there while I paint. This painting was done in a 5 x 8 moleskin watercolor journal.
Photo 1 - After sketching the scene in pencil I did some basic washes for the sky, the buildings, the bushes and the snow. I was using my trusty waterbrush at this point. (You can probably see that the journal is balanced on my lap.)
Photo 2 - I began adding adding ink around the buildings. I try not to completely outline the shapes with a continuous line. I use breaks in the lines, dots in some spots, scribbles and small dashes.
LOL It isn't easy to take photos in the confined space of the car.
I parked my car and moved the driver's seat back as far as I could to give me room to paint on my lap. Usually I put some kind of journal between the seats so I can balance my fieldkit there while I paint. This painting was done in a 5 x 8 moleskin watercolor journal.
Photo 1 - After sketching the scene in pencil I did some basic washes for the sky, the buildings, the bushes and the snow. I was using my trusty waterbrush at this point. (You can probably see that the journal is balanced on my lap.)
Photo 2 - I began adding adding ink around the buildings. I try not to completely outline the shapes with a continuous line. I use breaks in the lines, dots in some spots, scribbles and small dashes.
LOL It isn't easy to take photos in the confined space of the car.
Joan T
www.watercolorsbyjoan.blogspot.com


#2   02-04-2011, 10:49 AM - [add post to favorites] 02-04-2011, 10:49 AM - [add post to favorites] | ||||
| ||||
Re: Snowy Cutchogue View - Demo I usually use a micron pen for the lines...like the micron 05 in the first photo. I usually use sepia ink rather than black. It seems less stark to me. I continued using the pen on the buildings. If you touch a wet brush to the ink while it hasn't dried completely, it adds some nice color to the area when it bleeds. I did that with the red buildings. I added orange to the sunlit sides of the red building. I also deepened the color on the shaded side of the red and blue buildings, and added shadows on the snow areas of the bushes with cobalt blue. Joan T www.watercolorsbyjoan.blogspot.com |


#3 02-04-2011, 10:54 AM - [add post to favorites] | ||||
| ||||
Re: Snowy Cutchogue View - Demo To do the tree trunks and branches I used a travel brush (#6). For water I usually just squeeze a few drops of water from the waterbrush into the corner of one of the field kit palette sections. For a small painting that is just about enough and I keep adding more water as needed. If I'm doing a larger painting I use a water container that I sit in the car's cup holder. Joan T www.watercolorsbyjoan.blogspot.com |
#4 02-04-2011, 10:56 AM - [add post to favorites] | ||||
| ||||
Re: Snowy Cutchogue View - Demo With the travel brush I added more tree trunks and branches behind the buildings. Drybrush was used for some of the smaller branches and twigs. For this entire painting I only used a pencil, a waterbrush, the micron pen and the #6 travel brush. Joan T www.watercolorsbyjoan.blogspot.com |
#5 02-04-2011, 11:01 AM - [add post to favorites] | ||||
| ||||
Re: Snowy Cutchogue View - Demo Ink lines wer added to the fence and more snow shadows from the buildings. Here are a few photos that show the details on either side of the page. The paints I used are in my W&N field kit. You can see that I have added a few other colors in the corners. Joan T www.watercolorsbyjoan.blogspot.com |
#6 02-04-2011, 11:03 AM - [add post to favorites] | ||||
| ||||
Re: Snowy Cutchogue View - Demo Here is the finished painting. This photo was taken indoors so the lighting isn't as good as the other photos. I may add something in the foreground on the right yet. It looks a bit too empty right now. I'll live with it for a while before I decide. Hope you enjoyed seeing the steps! |